Memory expansion, mappers and slot expanders
Construct a 512KB memory mapper with a CPLD sold by L. Padial
Home made slot expander, by usario_msx2
With one CPLD, from L. Padial, http://msx.deneb.nl/pageIP.HTM and some smart wiring, usario_msx2 has constructed 4 slot slot expanders. Home made slot expander
Upgrade memory to 512K in a Sony HB-F9 by usuario_msx2
Thrid slot in NMS8250/55/80 with the MY connector, by Erik van Son (corrected version oct 2008)
ASCII Konami SCC type mapper circuit diagrams by Jipe
Konami mapper circuit diagram, by Jipe from MSX Cafe
ESE SCC SRAM megamapper, by Jipe from MSX Cafe
turboR ST and GT memory expansion Jean Pierre Dubois’ instructions how to expand the memory of the turboR ST and GT to 1Mb
Note: IC31 pin 5 , IC32 pin 5 must be connected to IC30 pin 5 ( is not noted in the pdf )
How to upgrade the memory on the Panasonic A1-WSX Guillian’s (Manuel Pazos) instructions on Panasonic A1-WSX memory upgrade (published by Dhau) to 512K.
512 kB RAM in the Panasonic FS-A1ST MSX turboR
Required
· 2x 44C256 RAM IC’s
· 2 SMD-capacitor 100 nF
2 SMD-weerstand 100 Ohm
· 1 resistor 10 kOhm
Follow the next steps:
1. Solder the RAM IC’s in the empty sockets IC31 and IC33.
2. Solder the SMD capacitors 100 nF on the empty locations C138 and C140.
3. Solder the SMD resistor 100 on the empty location R55.
4. Solder a 10 kOhm resistor on the empty location R41.
5. Solder a SMD resistor 100 Ohm on the empty location R229 on the bottom of the PCB!
6. Start the turboR ST and it should show 512KB!
Geheugenuitbreidingen (dutch, detailed articles)
128 kB RAM voor de Philips NMS 8220
256 kB RAM voor de Philips VG 8235/00
256 kB RAM voor de Philips NMS 8250/55/80
512 kB RAM voor de Philips NMS 8250/55/80
128 kB RAM voor de Panasonic FS-A1F
128 kB RAM voor de Panasonic FS-A1FM
512 kB RAM voor de Panasonic FS-A1ST MSX Turbo-R
256 kB RAM voor de Sony HB-F9P/S
128 kB RAM voor de Sanyo Wavy PHC-70FD(2)
Ombouw Sony HBM-512 Memory-Mapper naar 1024 kB
Ombouw Checkmark Memory-Mapper naar 1024 kB
192 kB VRAM voor MSX2-computers
Aanpassen Memory-Mapper Philips VG 8235/00
Addram: Manual and technical details about this 4 Mb memory mapper Note that this mapper has no back annotation so it will not work in most European MSX-2(+) machines.
Manual and technical details
Brazilian article how to build a megaram cartridge
megaram article
Megaram Upgrade by Jipe
Upgrade MegaRAM to 2Mb (Jipe aka as Jean-Pierre Dubois with the help of JP Grobler).
look at this circuit diagram (see here) to upgrade megaram from 256K to 2MB
sw1 is for switching offslot select to disconnect a cartridge after reset)
sw2 is for choise ascii 8k or konami 8k mapper type
You can replace 74F21 by 74LS688
For 512k add a second SIMM of 256K connect pin 14 of U11 to pin 2 (CAS) of second SIMM
All pin are common to all SIMM
Warning the circuit diagram has a bug:
– inverting D7 pin 1 U2:A 74ALS32
with D6 pin 4 U2:B 74ALS32
for all chips you can use LS series
See also this msx ram design with program
Megaram upgrade description by Hans Oranje
Also Hans Oranje made a description
on the Megaram upgrade for this
circuit diagram
900AP memory upgrade
1. needed parts 4x 4bit 256kb chips (for example 514256)
2. open the case (upper part)
3. remove disk drive(s)
4. put chips to empty sockets
5. put all parts back that’s all, since the 900AP standard has 512KB and is prepared for this upgrade
Hans Oranje ( Hardware Partners Nederland ) is a very knowledgeble MSX hardware designer and still active with updates and products as the BERT and the slot expander. He has recently done memory upgrades of a Philips NMS8250 of Michel Meilink to 1MB using a 30 pins SIMM. Also a 2/4 MB upgrade to JP Grobler’s NMS8250 was documented: the Hans Oranje made a detailed description how to perform these upgrade.
Note that Hans Oranje advises to use the 1 MB SIMMS with 3 IC’s and not the 9 chip types. If you only add 1 MB you can use the 9 chip type without problems. But for 2 MB the 9 chip variant puts a too heavy load on the buffer ICs (more ICs means more load!).
Upgrades with PC SIMM
1 MB upgrade NMS8245
1 MB upgrade NMS8250/55
2 MB upgrade NMS8250/55
4 MB upgrade NMS8250/55
1 MB upgrade NMS8280
2 MB upgrade NMS8280
4 MB upgrade NMS8280
2/4 MB upgrade NMS8250/55/80
MSX 256K memory mapper with static rams cartridge, designed by Luis Claudio Grosso.
Note that this circuit diagram of mapper in the NMS8250/55, contributed by Erik van Son, artwork by Erik Luppes, may help better understand and build the upgrade.
Some extra notes by Erik van Son, after successfully building the interface:
The general instructions are pretty good to read. Had some trouble in the beginning with the 74LS670 as 2 wires are soldered to the version on the PCB and some on the added IC.
This could help a lot for people who are not that experienced:
I removed first the memory ICs and put sockets in. That way I was able to see if all the wires are still in one piece on the memory part of the PCB. So you then put the memory back in and see if the machine still works.
You only need 2 and put them in socket 133 and 134. If you have 4 it is even better. Without the memory ICs an external memory cartridge also helps.
After that I put in all the ICs and wires and tested again with the old memory then I connected the SIMM.
This way you can trace your fault a little better then doing everything at once as it is very easy to make a mistake.
‘cut the pins 1 t/m 6 and 8 t/m 13 half’ means ‘”cut from the pins 1 to 6 and 8 to 13 the outer small part, so you can still solder wires on the pin but the pin does not connect to the socket.
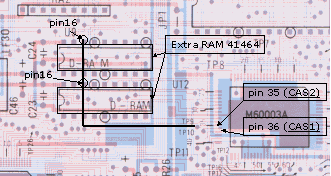
NMS8220 upgrade to 128K
Place on top of the existing two 41464 on each another 41464. Dont connect pin 16.
Connect a wire to the pin 16 of both IC’s and connector pin 35 of the M60003. Also move the bridgewire J2 to J43 to get a 128K report after startup.
MSX 1MB memory mapper Ram Cartridge,
design by M Fujimoto & MKT 1994/5 with static rams
MSX 1MB memory mapper Ram Cartridge
The JIPE memory mapper to 4Mb using SIMMs by Jean-Pierre Dubois including print layout (with corrected errors 31 may 2002)
The 8250/55/80 memory mapper to 4Mb using SIMMs by Jipe (Jean-Pierre Dubois) for the 8250/55/80
Do it yourself 32K S-RAM cartridge
Diagram of memory mapper (in English from Brasil)
Memory mapper Original article (reviewed CPU-MSX no 34 and 35) R. Bridges Roberto Silva
256kB Expand memory MSX-2 NMS 8250/55/80
Twilight produkties
256kB Expand memory MSX-2 NMS 8250/55/80
512 kB Expand memory MSX-2 NMS 8250/55/80
MSX Mapper design by Luis Claudio Grosso
Panasonic MSX turboR A1 ST can be upgraded internally to 1Mb RAM
The article is available in Spanish and in English
MCM 43 Memory mappers Verbeter een ontwerpfout in de 256/512K memory mappers
Extra geheugen in de Philips MSX-2 computers: van VG8235 tot NMS8280
Geheugenuitbreiding
Digital KC geeft zijn kennis voort. Schema en achtergrond van de tot 4 MB grote megamapper
De megamapper
Latest version by Hans Oranje
Wavy70FDD memory upgrade to 128K (japanese, the photo’s explains the upgrade, only needed are RAM IC’s, a capacitor and changing a jumper)
Wavy70FDD memory upgrade to 128K
64K RAM extra in a NMS8220
Article by Hans Oranje
Slotexpanders
Eenvoudige slot extender, not a slot expander but just as handy and much cheaper and easier to build! Article by HansO
Simple slot extender (english)
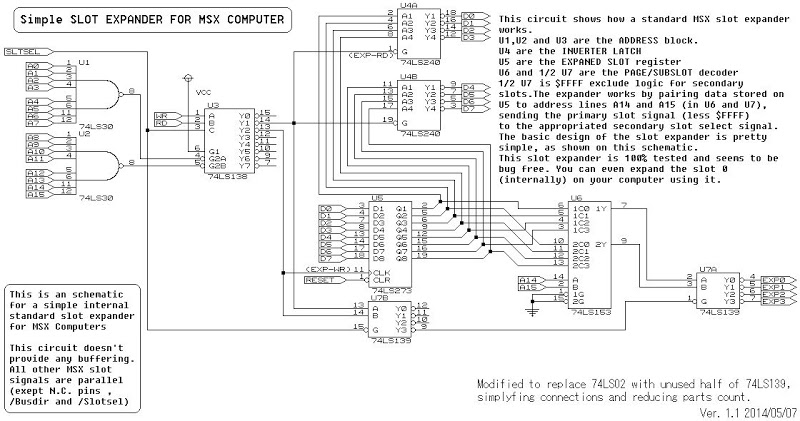
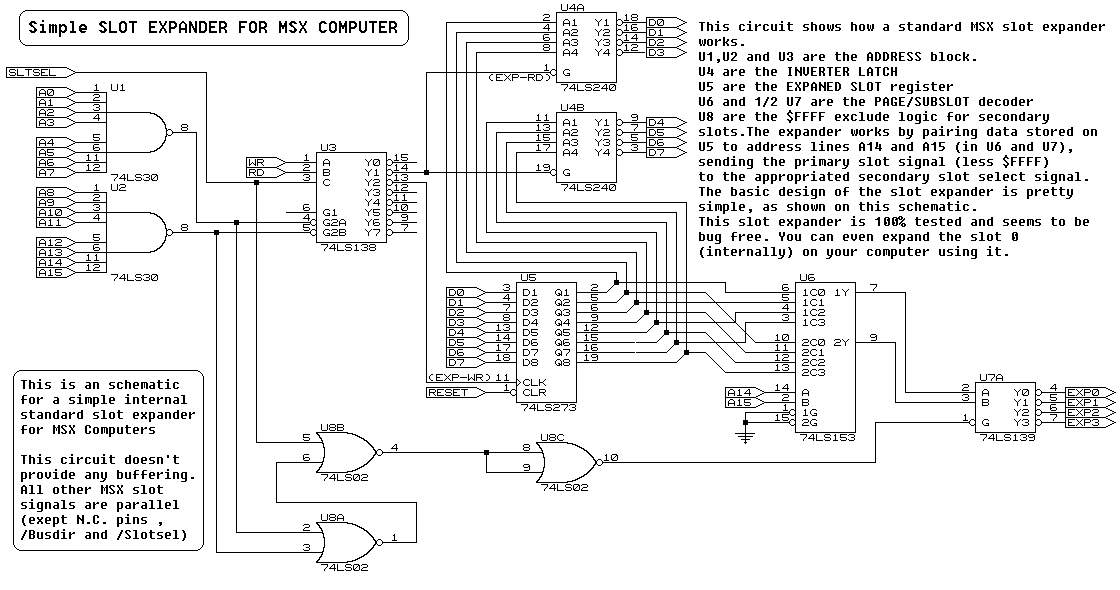
Circuit diagram of simple (internal) slot expander (note the missing BUSDIR, see the PTC article!), see also the magazine section MCCM and PTC for other slot expanders, Leonard Silva de Oliveira (simplified version on ASCII design at MSX Datapack)
MCCM 70 Digital KC geeft zijn kennis voort. Schema en achtergrond van de slotexpander
De slotexpander
Circuit diagram of the slotexpander
Circuit diagram of the slotexpander cartridge
MSX Club Magazine 37, 38
Slotexpander eerst begrijpen en dan bouwen Theorie, schema en aanwijzingen voor een MSX slotexpander
PTC Print 36
Schema’s van een slotexpander met correcties twee jaar later
Slotexpander voor MSX 1 en 2
Mini mapper for memory expansion
Article by Hans Oranje
Two designs published on the net recently:
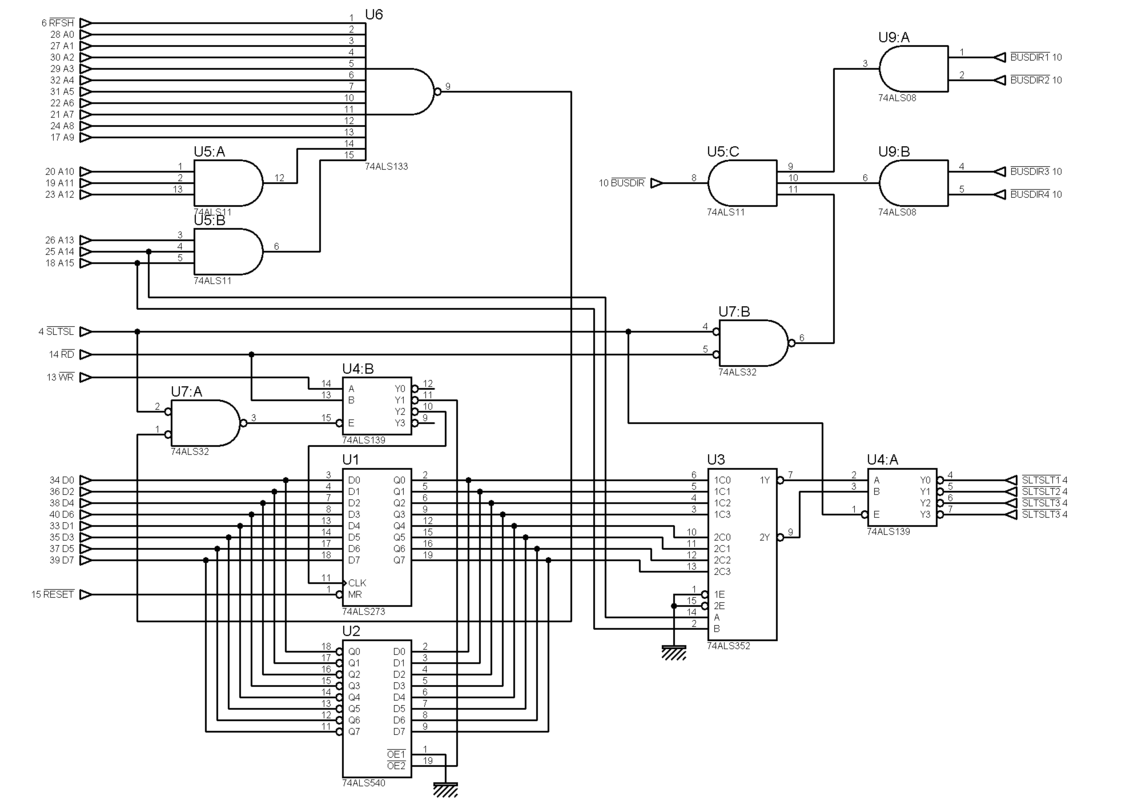
It is possible to replace the 74ls352 with a 74ls153 and then invert the outputs with a 74LS04 since the 352 is difficult to find.
You can use LS153 without LS04 if you invert SLTSL order.
slot 1=slot 4
slot 2=slot 3
slot 3=slot 2
slot 4=slot 1
